
Setup Membership templates
- In your HubSpot account, click the ⚙️ settings icon in the top navigation bar.
- In the left sidebar menu, navigate to Content > Private Content.
- Click the Choose a domain to edit dropdown menu and select the domain your private content is hosted on.
- Navigate to the Pages tab.
- You can use the dropdown menus to select a custom HTML template for the following page types:
- Registration page: the page where invited contacts can sign up to access private content.
- Select Nexus Enterprise - Membership Registration (in nexus-enterprise/templates/system)
- Sign in page: the page where visitors sign in to access private content.
- Select Nexus Enterprise - Membership Login (in nexus-enterprise/templates/system)
- Request password reset page: the page a visitor will see when they request a password reset.
- Select Nexus Enterprise - Membership Reset Password Request (in nexus-enterprise/templates/system)
- Create new password page: the page where visitors will create a new password.
- Select Nexus Enterprise - Membership Reset Password (in nexus-enterprise/templates/system)
- Registration page: the page where invited contacts can sign up to access private content.
Video Explainer
Manage membership for private content
With memberships, you can manage which visitors can access your private blog, page, knowledge base, and customer portal content. Contacts who can access private content are sorted into access groups.
Accounts with a Content Hub Professional subscription can have up to 2 access groups, while accounts with a Content Hub Enterprise subscription can have up to 100 access groups.
Create static access groups
In a static access group, contacts are added manually, either as individual contacts or as members of static lists. Users must have Edit permissions for lists to edit access groups.
- In your HubSpot account, navigate to Content > Memberships.
- Click Create access group.
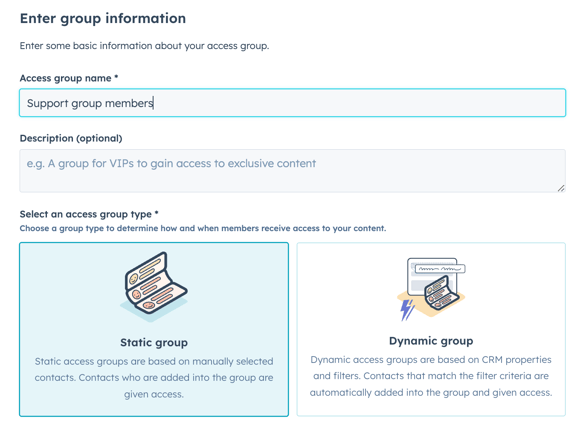
- In the Access group name field, enter a group name. You can also enter a description of the group in the Description field.
- In the Select an access group type section, select Static, then click Next.
- Click the Give access to dropdown menu, then type the name of a contact or static list. Select the checkbox next to each contact or list you want to add.
- When you've added all contacts, click Next.
- Review the contacts and lists you're adding to the access group, then click Create group.
- To edit the access group, click the Actions dropdown menu and select Edit.
- To delete the access group, click the Actions dropdown menu and select Delete.
Create dynamic access groups
In a dynamic access group, contacts are automatically added based on filters. Users must have Edit permissions for lists to edit access groups.
- In your HubSpot account, navigate to Content > Memberships.
- Click Create access group.
- In the Access group name field, enter a group name. You can also enter a description of the group in the Description field.
- In the Select an access group type section, select Dynamic.

- Set up your filter criteria, then click Next.
- Review the preview of contacts in the group, then click Create group.
Restrict page access to access groups
Once you've set up your access groups, you can restrict access to posts, pages, articles, and your customer portal to those access groups. Making content private sends a registration email to the members of the associated access groups.
-
Navigate to your content:
- Website Pages: In your HubSpot account, navigate to Content > Website Pages.
- Landing Pages: In your HubSpot account, navigate to Content > Landing Pages.
- Hover over the page and click Edit.
- In the content editor, click the Settings menu and select Audience Access.
- In the dialog box, select Access group membership required.
- Click the dropdown menu and select the checkboxes next to the access groups you want to register for access to this page.

- Click the X in the top right of the dialog box to resume editing.
- When you are finished editing, click Publish or Update in the top right.